You would like to use a drawing app, but you keep putting it off — "I have to install an app," "signing up and logging in is a hassle," "I'm a little worried about privacy when I let my child use it." Do any of those sound familiar?
Oekaki Studio (おえかきスタジオ) is a free drawing tool that runs in your browser alone. No install, no sign-up — on a computer or a tablet, you can start drawing the moment you open the page. What's more, the data you draw never leaves your device. Everything is processed inside your browser, so you can handle your child's artwork and photos with peace of mind.
And what makes Oekaki Studio unique is how it combines this gentleness with serious, capable features. On one hand, the "hiragana mode" switches the entire menu to hiragana so even young children can operate it themselves; on the other hand, it comes with node (Bézier) editing, focus lines, vector (SVG) export and gradients on par with a design app for grown-ups — all for free. It's made for kids, yet it can do all this — that is Oekaki Studio's biggest selling point.
In this article, aimed at parents and teachers, I'll introduce what you can do with Oekaki Studio while walking first-time users through the basics.
Oekaki Studio
Drawing, vector shapes and SVG export, right in your browser
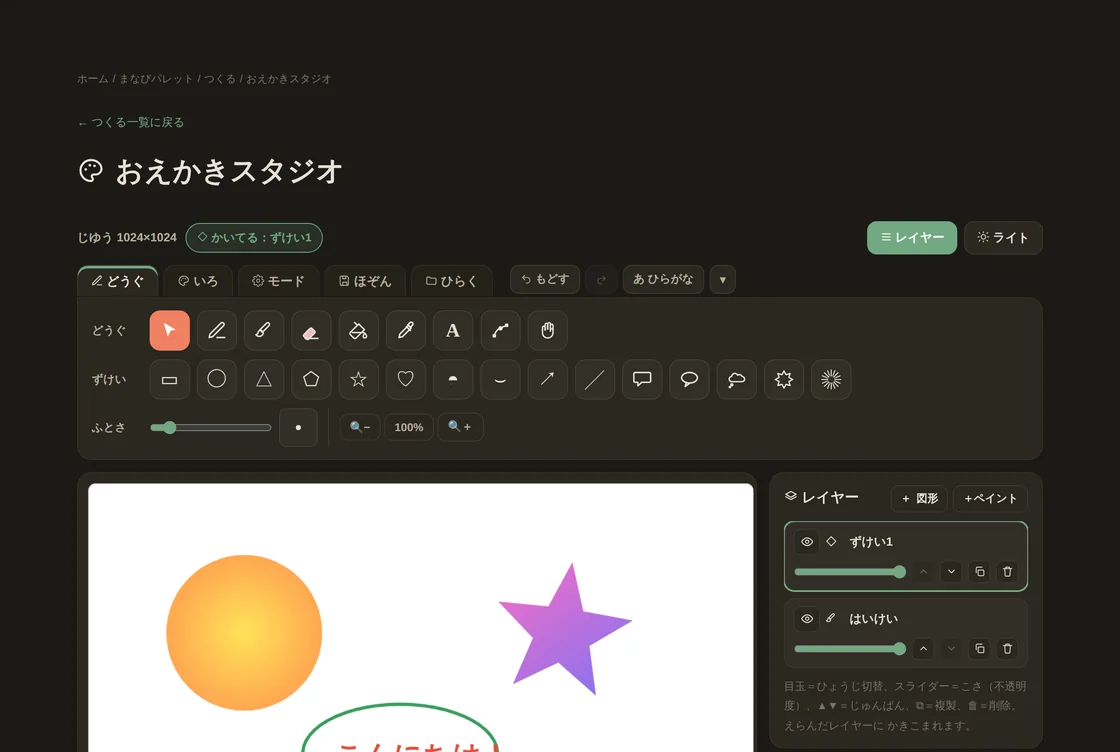
What you can do with Oekaki Studio
Oekaki Studio lets you handle both freehand "drawing" with a pen and neatly placed "vector shapes" — circles, squares, stars and so on — all on a single screen. Its main features include the following.
- Pen, brush and eraser
- In addition to a regular pen, there are marker, pencil and brush styles, and on an iPad with Apple Pencil they respond to pen pressure.
- Vector shapes (more than 20 types)
- Squares, circles, triangles, stars, hearts, arrows, speech bubbles, focus lines and more. You can freely change the color, size and corner roundness afterward.
- Layers (drawing in stacks)
- You can draw the background, characters, text and so on as separate layers. Reordering them or fixing just one part is easy.
- Adding text
- Choose the font, size, color, outline, line spacing and alignment, and place text just like in PowerPoint.
- Gradients
- Three kinds: linear, radial (circular) and freeform. You can blend 2 to 8 colors for genuinely rich coloring.
- Node editing (fine-tuning the shape)
- Edit a shape by its "points" to reshape it into something original. Curves are supported too.
- Importing images and removing white backgrounds
- Import a photo or illustration and make a white background transparent with one click.
- Export as PNG or SVG
- Save your work as an image (PNG), or as a vector format (SVG) that stays sharp when enlarged.
Situations where it comes in handy
Oekaki Studio answers both a child's wish to "just draw freely" and its role as a tool for learning and creation.
- At home, a child enjoys drawing freely (you can save the work as a PNG and even print it)
- Rough sketches for arts and crafts, or practice trying out color combinations
- Making speech bubbles, icons and decorative headings for classroom displays and handouts
- Creating backgrounds and characters for four-panel comics or picture-story shows
- Exporting logos and small accent shapes as sharp, enlargeable SVGs to paste into documents
- Cutting out a photo's background to use for collages and material-making
The three basic "ways to draw"
To start, if you learn just the three tools in the toolbar at the top, you can do most things.
- 1. Pen
- Draws freehand lines. On a shape layer they become lines you can edit later; on a paint layer you can paint continuously as you draw. Change the thickness with the "Thickness" slider.
- 2. Shapes
- Choose a button such as square, circle or star, then drag on the canvas to place the shape. After placing it, you can change the color (fill and outline) and corner roundness as many times as you like.
- 3. Text
- Press the "A" button and click the canvas to type text right there. Double-click any time to retype it.
If you make a mistake, you can always redo it with the "Undo" button (Ctrl+Z).
No need to read kanji — the hiragana mode
One of Oekaki Studio's big features is hiragana mode. Press the "あ hiragana" button in the top right of the screen and the entire menu and settings switch to hiragana. "背景 (background)" becomes "はいけい," "透明 (transparent)" becomes "とうめい," and "snap" becomes "ピタッと そろえる (snap neatly into place)," so that even lower-grade elementary children who cannot yet read kanji can read and operate it themselves. Below is a side-by-side comparison of the same settings panel in "kanji" display and "hiragana" display.
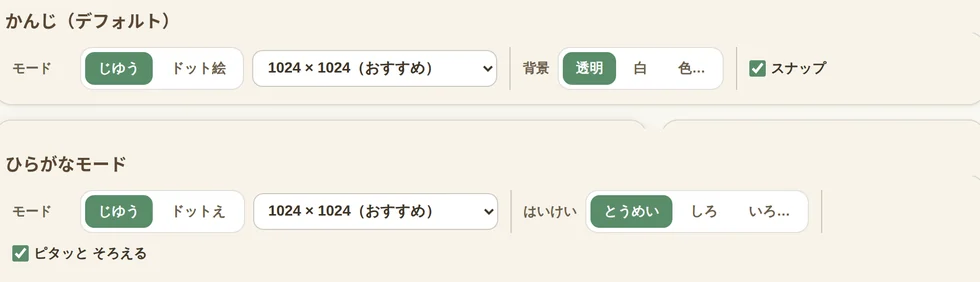
Rather than adding furigana readings, the display itself becomes hiragana, so even a child drawing for the first time can learn the controls at their own pace without an adult constantly at their side. Of course, the same button switches back to the original display any time. Whether at home or in the classroom, it's a feature that encourages that "I did it myself!" moment.
You can set the canvas size and background right at the start
On the "Mode" tab, you can choose the size and background of the canvas (the surface you draw on) before you start. The size can be chosen from five steps — 512 / 768 / 1024 / 1080 / 1440 pixels — and we recommend 1024 × 1024. The larger the number, the crisper the finished picture (and the slightly heavier the file), so you can pick to suit your purpose — for social media, for printing and so on.
You can choose the background from three options: "transparent," "white" or "a color of your choice." If you set it to transparent, exporting as PNG gives you an image with the background cut out, so you can layer it over other pictures directly as a sticker, icon or collage material. If you choose white or a favorite color, it is saved as a background filled with that color. You can tell whether it's transparent by whether a checkerboard pattern is visible behind the canvas.
The "Mode" tab also lets you switch between free mode, which draws smoothly, and pixel-art mode, which draws along a grid. It's handy when you want to enjoy making pixel art.
How to read the icons (a list of tools and shapes)
Each icon on the toolbar means the following. You don't have to memorize them all at first — starting with the ones you use often is plenty. Hover over them (long-press on a tablet) to see a description of each name.

Select and move; change size or rotation
Draw freely (shapes become editable lines)
Paint smoothly and continuously (pressure-sensitive)
Erase (shapes can be erased one at a time)
Fill an enclosed area with color
Pick up a color from the picture
Add text (double-click to retype)
Edit a shape by its "points" (curves OK)
Move the canvas (or Space + drag)
Rectangle (corners can be rounded)
Circle / ellipse
Triangle (corners can be rounded)
Polygon (change the number of sides)
Star
Heart
Half-circle
A smiling mouth or eyes (flip vertically for ∩)
Arrow
Straight line
Rectangular speech bubble (dialogue)
Round speech bubble (dialogue)
Inner voice or thoughts
Jagged bubble for emphasis
Manga-style emphasis effect
Draw in "stacks" with layers
A major feature of Oekaki Studio is "layers." Picture stacking several transparent sheets on top of one another — you can, for example, draw the "background," "characters" and "text" on separate layers.
When you keep layers separate, later fixes like "move only the character" or "change just the background color" can be made without touching the other parts. In the panel on the right you can toggle visibility, reorder layers and adjust opacity (density).
If you feel "layers seem hard," you can start by drawing on a single layer, that's fine. Once you get used to it, try separating the background from the main subject — it makes editing dramatically easier.
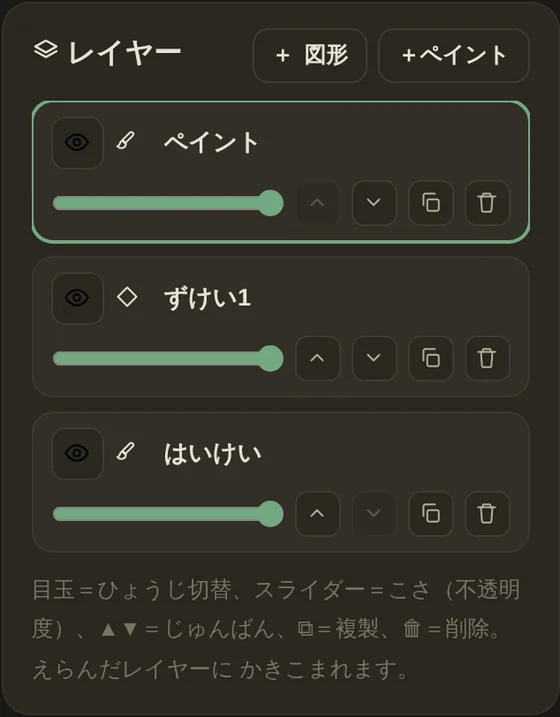
This idea of "building in stacks" is actually a basic that runs through many creative fields — the cel animation and digital line art of animation, photo editing, design software and more. Getting familiar with the layer structure from an early age lays the foundation for understanding all sorts of tools in the future.
Make free-form shapes with shapes and node editing
You can not only change a placed shape's color and size, but also combine two or more shapes by "union (merge)," "subtract (punch out)" and "intersect (keep only the overlap)" to create new forms. It's the same idea as PowerPoint's "Merge Shapes."
Furthermore, with "node editing" you can edit a shape by the "points" of its outline. You can move, add or remove points, and by using the "rounding (handles)" you can also handle smooth curves. Make a star or heart slightly irregular, or build the shape of an original character — you can answer a child's wish to "make it look like this."
Flip, rotate, mirror and kaleidoscope freely with the "center point"
When you select a single shape, a small cross-shaped "center point" appears near its middle. This is a very important point that becomes the "fold axis" for left-right and up-down flipping, the center of rotation, and the center of the mirror and kaleidoscope. You can drag the center point to any position you like, and it snaps to the edges and middle of the shape, so it's easy to place exactly where you want.
- Flip horizontally / flip vertically
- Flips the shape like a mirror around the center point. Change where the center point is and you change "which axis it flips around," so you can flip at exactly the position you intend.
- Rotation around the center point
- Rotation is also centered on the center point. Place the center point outside the shape and you get an "orbit"-like motion that circles around that point.
- Mirror duplicate (horizontal / vertical)
- Leaves the original shape as it is and makes a copy flipped around the center point. You can create a left-right symmetrical picture in one shot — butterflies, faces, patterns and so on.
- Kaleidoscope (radial copy)
- Arranges a set number of rotated copies radially around the center point. Just by changing the number, you can easily make snowflakes, flowers and geometric patterns.
- Flipping also flips the "nodes"
- When you flip, the outline points (nodes) flip along with it, so even asymmetrical shapes flip cleanly, exactly as you intend.
- Redraw lines and arrows by their "endpoints"
- Select a line or arrow and points appear at both ends. Drag those points to easily redraw the length and direction of the line afterward.
Split things apart with the cutter — you can even make Saturn's rings
Select a shape, press "cut" (✂), and trace a single line across the shape to split it into two along that line. Where "subtract" "punches out by overlapping," the cutter is a tool that "splits one into two." After cutting, each piece becomes a separate shape, so you can change their colors or swap their front-to-back stacking order.
Using this, even in a flat drawing you can create a three-dimensional effect like "Saturn." Here are the steps.
- Subtract a small ellipse from a large ellipse to make a thin ring.
- On top of it, place a circle that will become the planet.
- Select the ring and use "cut" to trace a single horizontal line across the middle of the planet, cutting it (this splits it into an upper half and a lower half).
- Using layers, reorder them so the upper half is "in front" of the planet and the lower half is "behind" it.
Now the ring appears to wrap around behind the planet, giving you a Saturn with a real sense of depth. The cut line can be diagonal, and if you trace while holding Shift, it cuts perfectly horizontally or vertically.
Add rich color with gradients
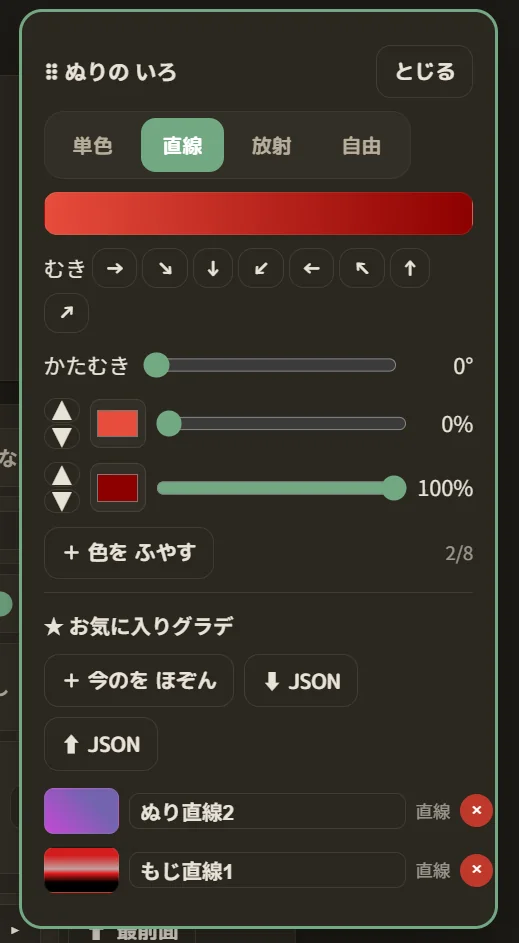
Color isn't limited to a single flat tone — you can also use gradients (color transitions). Oekaki Studio has three kinds of gradient.
- Linear gradient
- Color changes in a straight line — left to right, top to bottom and so on. The "direction" button lets you easily pick diagonal directions too.
- Radial (circular) gradient
- Color spreads outward in a circle from the center. It gives a three-dimensional feel like a sun or a ball.
- Freeform gradient
- Place color points freely on the shape and blend them so they bleed together. You can create soft, multi-colored effects like a sunset or a rainbow.
You can add anywhere from 2 to 8 colors. Give a color scheme you like a name and save it to "★ Favorite gradients," and call it up with one tap from then on. Favorites can also be exported and imported as JSON files, which is handy for backups and sharing.
Add manga-style "impact" with focus lines, in one press
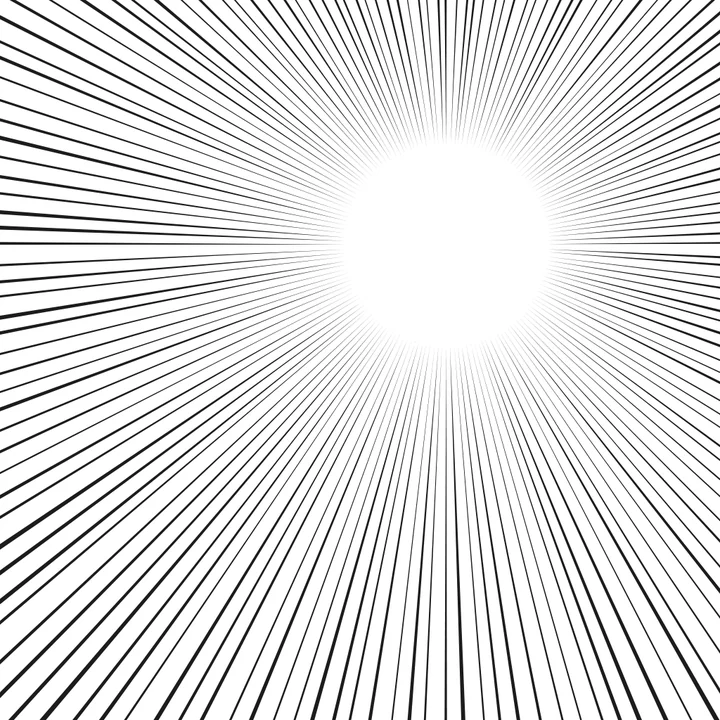
Oekaki Studio includes the focus lines familiar from manga as one of its shapes. Focus lines are usually a chore to draw, but here you just choose "focus lines" and drag on the canvas to instantly get the radial lines shown below. They're perfect for scenes where you want to convey surprise, a sense of speed or "look here!"
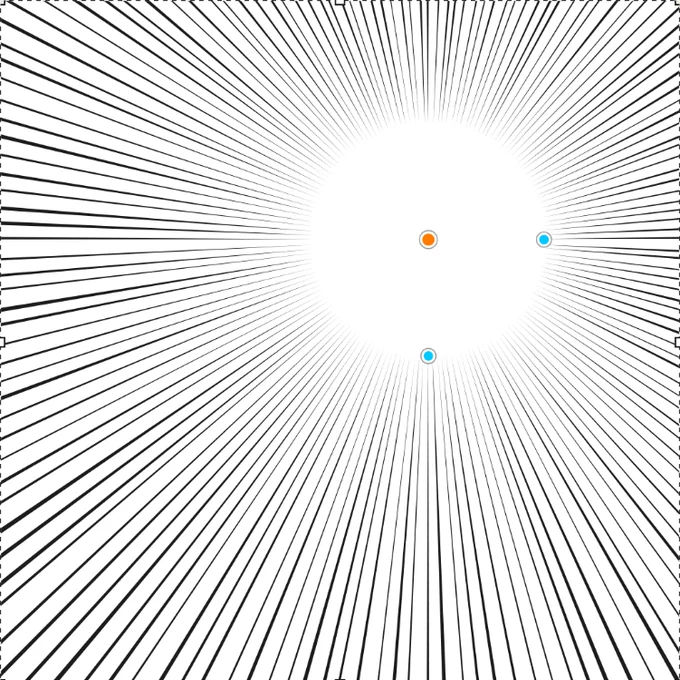
Adjusting them after placing is very intuitive too. Drag the orange point to freely move the center where the lines converge (in the example above it's shifted to the upper right), and drag the blue point to change the size of the empty circle (spotlight) at the center. The trick is to place your main subject inside this "empty circle." On top of that, you can choose the line shape from two types — "normal" and "pointed" — and adjust the number and thickness with sliders. Change the color and you can go from black focus lines on a white background (the classic manga look) all the way to a soft pastel style. A tool with focus lines this finely adjustable built in from the start is hard to find for free.
Remove a photo's white background in one click
After importing a photo or illustration, you can make a white (or light single-color) background transparent with one click using the "Remove Background" button. Because it traces the background color inward from the edges to make it transparent, it cleanly removes only the surrounding background while leaving white areas inside the subject intact. The cut-out image can be used directly for collages and material-making.
Saving your work — PNG and SVG, and projects
You can save your finished work in three forms to suit your purpose.
- PNG (image)
- The most common image format. You can print it, paste it into documents or post it on social media. You can also export it with the background left transparent.
- SVG (vector)
- A clean vector format that doesn't blur when enlarged. It's suited for logos, shapes and text you want to stretch out large.
- Project (.json)
- A format that saves the layer and shape information as-is. Open it later to keep editing from where you left off.
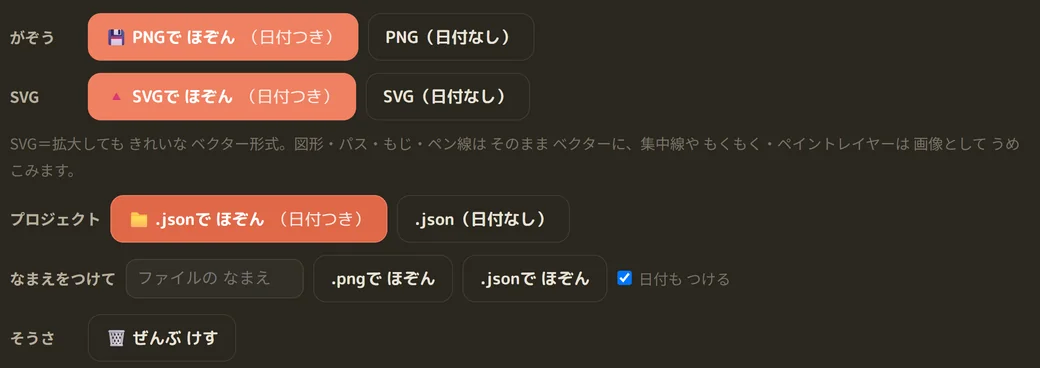
You can name and save files in Japanese (hiragana). Because you can save with names a child can read themselves, such as "ねこのえ (a picture of a cat)" or "おはなばたけ (a flower field)," they're easy to find again later.
Design choices for peace of mind
Oekaki Studio, made on the assumption that children will use it, includes several considerations.
- Your data never leaves the device. The pictures you draw and the photos you import are processed inside the browser only and are not sent to a server.
- No sign-up or login required. You can use it right away without entering personal information.
- Hiragana mode. The entire menu can be switched to hiragana. Even children who cannot read kanji can operate it themselves.
- Tablet support. Finger and Apple Pencil input are supported. It draws smoothly even on an iPad.
- Autosave. Your work in progress is automatically saved temporarily in the browser, so even if you close the page by accident, it can be restored when you reopen it.
That said, we recommend saving important work to your own device as a PNG or project (.json) (autosave is only temporary).
A few little tips to enjoy it more
Finally, here are some handy ways of using it that are good to know.
- Put text in a speech bubble: Double-click a speech bubble to type text inside it. You can easily create manga-style dialogue.
- Go "manga-style" with focus lines: Place the "focus lines" shape and you can instantly create a manga-like sense of impact. You can choose the line shape from "normal" and "pointed," and freely adjust the center position, the number of lines and the degree of pointedness. They're perfect for scenes of surprise, speed or emphasis — and surprisingly rare as a feature in free tools.
- Round off jagged shapes: Press "round everything" in node editing and polygons, stars, and even freehand pen strokes turn into soft, curved shapes (use "make everything angular" to revert at any time).
- Make parts and import them: Make just an "eye" or just a "flower," export it, and import it into another picture to combine them.
- Duplicate quickly: Drag a selected item while holding Alt to move it while duplicating. Handy when you want to line up several of the same shape.
- Pixel-art mode: Switch the mode to "pixel art" to draw grid-aligned pixel art.
No need to memorize shortcuts — just touch and it works
High-function graphics software can require you to learn a great many features before you can make the most of it. Oekaki Studio is built to reduce that "burden of memorizing" as much as possible, valuing the idea that you can understand it just by looking at the screen and touching it. In particular, it has the following touches.
A "control window" appears right next to what you selected
Tap a shape or picture to select it, and a small control window (a floating toolbar) appears right beside it. "Select," "duplicate," "delete (trash)," "node editing," "save PNG" and more can be pressed right there without hunting through menus. Because what you want to operate and the operation buttons are close together, you can work without moving your eyes.
You can always get back to "Select (the selection tool)"
Even while using another tool, tap the "Select" button in the control window, or tap an empty spot on the canvas, to return to the selection tool right away. It's harder to get lost wondering "which tool was I on again?"
Right-click (long-press) menu
Right-click a shape (long-press on a tablet) and you can choose things like moving it to the front or back, flipping, union and subtract, and removing an image's background right there, just like in PowerPoint.
Large − / + buttons that are easy to press with a finger
The number-entry fields have large "−" and "+" buttons. Without typing exact numbers, you can adjust little by little just by tapping. They're a size that's easy to handle on a tablet too.
Clear tabs, and an always-visible "Undo / Redo"
Because things are split into tabs — "Tools, Colors, Mode, Save, Open" — you can reach the place you want quickly. And at the top of the screen, the "Undo" and "Redo" buttons shown above are always displayed. With these two, you can try things freely without being afraid of mistakes.
On a computer you can also use Ctrl+Z = undo and Ctrl+Y = redo.
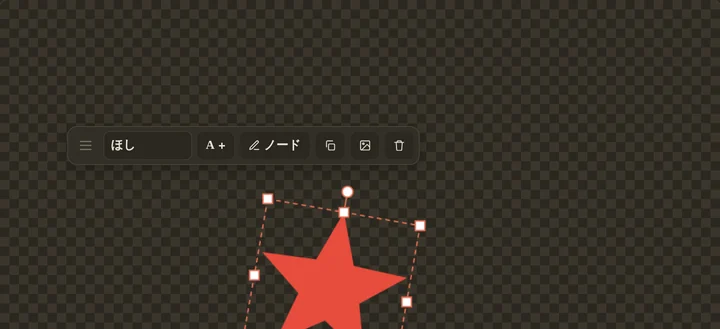

Making specialized features usable by touch even without specialized knowledge — this is where Oekaki Studio puts particular effort. Children, and people who don't normally use design software, can casually enjoy genuinely capable expression.
Handy keyboard shortcuts for using it on a computer
When using it on a computer with a mouse and keyboard, learning the keyboard shortcuts makes things even more comfortable (of course, everything can also be operated from buttons). Here are the ones you'll use most.
Choosing a tool
Editing
Move and arrange
View and saving
If you're using a Mac, you can operate it the same way with ⌘ (Command) instead of Ctrl.
Frequently asked questions (FAQ)
- Is Oekaki Studio free?
- Yes, it is completely free. No sign-up, no login and no installation are required — just open your browser and start using it right away. There are no extra charges or in-app purchases.
- Do I need to register or create an account?
- No. You can start drawing right away without entering an email address or any other personal information.
- Does it work on an iPad or tablet?
- Yes. It supports finger and Apple Pencil input, and draws smoothly in the browser on an iPad or Android tablet. It also works on a computer (Windows, Mac or Chromebook).
- Is my artwork data safe? Where is it stored?
- The data you are working on is never sent outside your device (to a server) — it is processed inside your browser only. You can save your work to your own device as a PNG image, SVG (vector) or project (.json). There is also automatic temporary saving so you can recover your work even if you close the page by accident.
- Can I export as a vector (SVG)?
- Yes. Shapes, paths, text and pen strokes can be exported as clean vector graphics (SVG) that stay sharp when enlarged. This is useful for logos, icons and making data for cutting machines.
- Can I create manga-style effects such as focus lines and speech bubbles?
- Yes. Focus lines, speech bubbles, thought clouds (mokumoku) and more are provided as shapes. For focus lines you can finely adjust the center position, number of lines, thickness and line style (normal / pointed).
- Can I make a photo's background transparent?
- Yes. Import a photo or illustration and make its white (or light single-color) background transparent with one click using "Remove Background." You can export it as a transparent PNG, which is handy for making stickers and collage materials.
- Can children use it?
- Yes. There is a "hiragana mode" that switches the entire menu to hiragana, so even children who cannot yet read kanji can operate it themselves. Because the data never leaves the device, parents can let their children use it with peace of mind.
In summary
Oekaki Studio is a free drawing tool you can use just by opening your browser — no install, no sign-up. From freehand drawing with a pen to genuinely capable features on par with a design app for grown-ups — layers, vector shapes, node (Bézier) editing, gradients, focus lines and SVG export — everything is together on a single screen. And on top of that, the hiragana mode lets even young children operate it — it's made for kids, yet it can do all this, and that's its biggest appeal. With a peace-of-mind design in which your data never leaves the device, and with tablet support, everyone from children to adults, even first-timers, can enjoy it casually.
First, just open it once and draw something. You're sure to discover things and think, "wow, it can do this too."
Open Oekaki Studio
No sign-up, completely free, drawing in your browser alone
See the other "Create" tools
3D Crafting (3D modeling, STL/3MF export) and more